Due to the increasing number of tools that can create Python bindings of popular libraries written in another programming language, it became easy to extend and use these libraries from a Python code. Tools like SWIG, Shiboken, Cython, among others, made it so easy to write Desktop GUIs (Graphical User Interfaces). One of these libraries is PySide2, a port of Qt5 to Python.
PySide2 is the official Python module from the Qt for Python project, which provides access to the complete Qt 5.12+ framework. - https://pypi.org/project/PySide2/
In this article, we will discuss how to install and use PySide2 by writing a desktop application.
Installation
To install PySide2 using pip, run the command pip install pyside2.
A simple window
PySide2 or Qt user interfaces are widget-based. The base class for all user interfaces is the QWidget class. To create a simple window using QWidget, simply initialize a QWidget object and call show() function for the widget to appear. In the example below, we used QApplication which controls the GUI's control flow and main settings and called exec_() to start the main loop.
#!/usr/bin/env python
import sys

from PySide2.QtWidgets import QApplication, QWidget

if __name__ == '__main__':
    application = QApplication(sys.argv)
    window = QWidget()
    window.setWindowTitle("Example Window")
    window.show()
    sys.exit(application.exec_())
After executing the above code, we should be able to see a blank window.

The QMainWindow
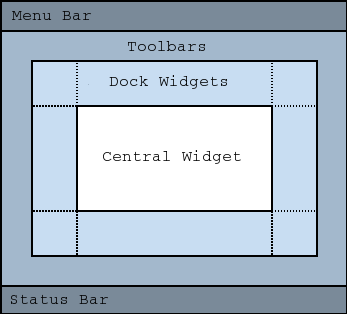
As a base class, QWidget is very extensible if we want to write a custom widget. However, if we want a complete window application, the QMainWindow class has almost all the basic features we need for a user interface. A QMainWindow provides the following layout which includes a menu bar, a location for toolbars, dock widgets, a status bar and a central widget,
To write a simple mainwindow, simply change QWidget to QMainWindow from the previous example. Now we can easily add an action, for example, terminating the application.
#!/usr/bin/env python
import sys

from PySide2.QtWidgets import QApplication, QMainWindow, QMenuBar, QMenu

if __name__ == '__main__':
    application = QApplication(sys.argv)
    window = QMainWindow()
    window.setWindowTitle("Example MainWindow")
    menu_bar = window.menuBar()
    file_menu = menu_bar.addMenu("File")
    file_menu.addAction("Exit", application.quit)
    window.show()
    sys.exit(application.exec_())
The above example code will result to a window with an Exit action in the File menu.

Refactoring
The above example code base becomes larger as we add more widgets to it. To solve this, we can refactor our code by inheriting the widget classes and implementing the functionalities inside these classes.
#!/usr/bin/env python
import sys

from PySide2.QtWidgets import QApplication, QMainWindow, QMenuBar, QMenu


class MyWindow(QMainWindow):

    def __init__(self, *args, **kwargs):
        super(MyWindow, self).__init__(*args, **kwargs)
        self.setWindowTitle("Example MainWindow")
        menu_bar = self.menuBar()
        file_menu = menu_bar.addMenu("File")
        file_menu.addAction("Exit", QApplication.quit)


if __name__ == '__main__':
    application = QApplication(sys.argv)
    window = MyWindow()
    window.show()
    sys.exit(application.exec_())
Writing a complete example
We will be creating an image viewer that has a menu and a viewer as the central widget. First step is to create a Viewer class by painting the image directly to the widget.
#!/usr/bin/env python
from PySide2.QtGui import QImage, QPainter, QPixmap
from PySide2.QtWidgets import QWidget


class Viewer(QWidget):

    def __init__(self, *args, **kwargs):
        super(Viewer, self).__init__(*args, **kwargs)
        self.image = QImage()

    def set_image(self, file_name):
        self.image.load(file_name)

    def paintEvent(self, event):
        painter = QPainter(self)
        if self.image:
            painter.drawPixmap(0, 0, QPixmap.fromImage(self.image))
The last step is to create the main window and set a Viewer object as the central widget. The Open menu action will acquire the image path using QFileDialog.getOpenFileName.
#!/usr/bin/env python
import os

from PySide2.QtWidgets import QMainWindow, QAction, QFileDialog

from viewer import Viewer


class MainWindow(QMainWindow):
    def __init__(self, *args, **kwargs):
        super(MainWindow, self).__init__(*args, **kwargs)
        self.setWindowTitle("Image Viewer")
        self.setMinimumSize(600, 400)
        menu_bar = self.menuBar()
        file_menu = menu_bar.addMenu("File")
        file_menu.addAction(QAction("Open", self, triggered=self.open))
        self.viewer = Viewer()
        self.setCentralWidget(self.viewer)

    def open(self):
        file_name, filter_ = QFileDialog.getOpenFileName(
            self,
            caption="Open Image",
            dir=os.path.expanduser("~/Pictures/ron.sh"),
            filter="Images (*.png *jpg)",
        )
        self.viewer.set_image(file_name)
        self.update()
We should be able to open PNG and JPG files as defined in the filter.

To wrap up
There is another popular Python library for Qt which is called PyQt. However, PySide2 has less restrictions as it is licensed under LGPL compared to PyQt's GPL license. In addition, PySide2 is the official Python binding for Qt5. In terms of maturity, PyQt definitely takes the spot.
Qt/C++ is a popular cross-platform library for C++. With the introduction of Python bindings like PySide2 and PyQt, developing Qt applications became easier and faster.


